Koler with pen and paper
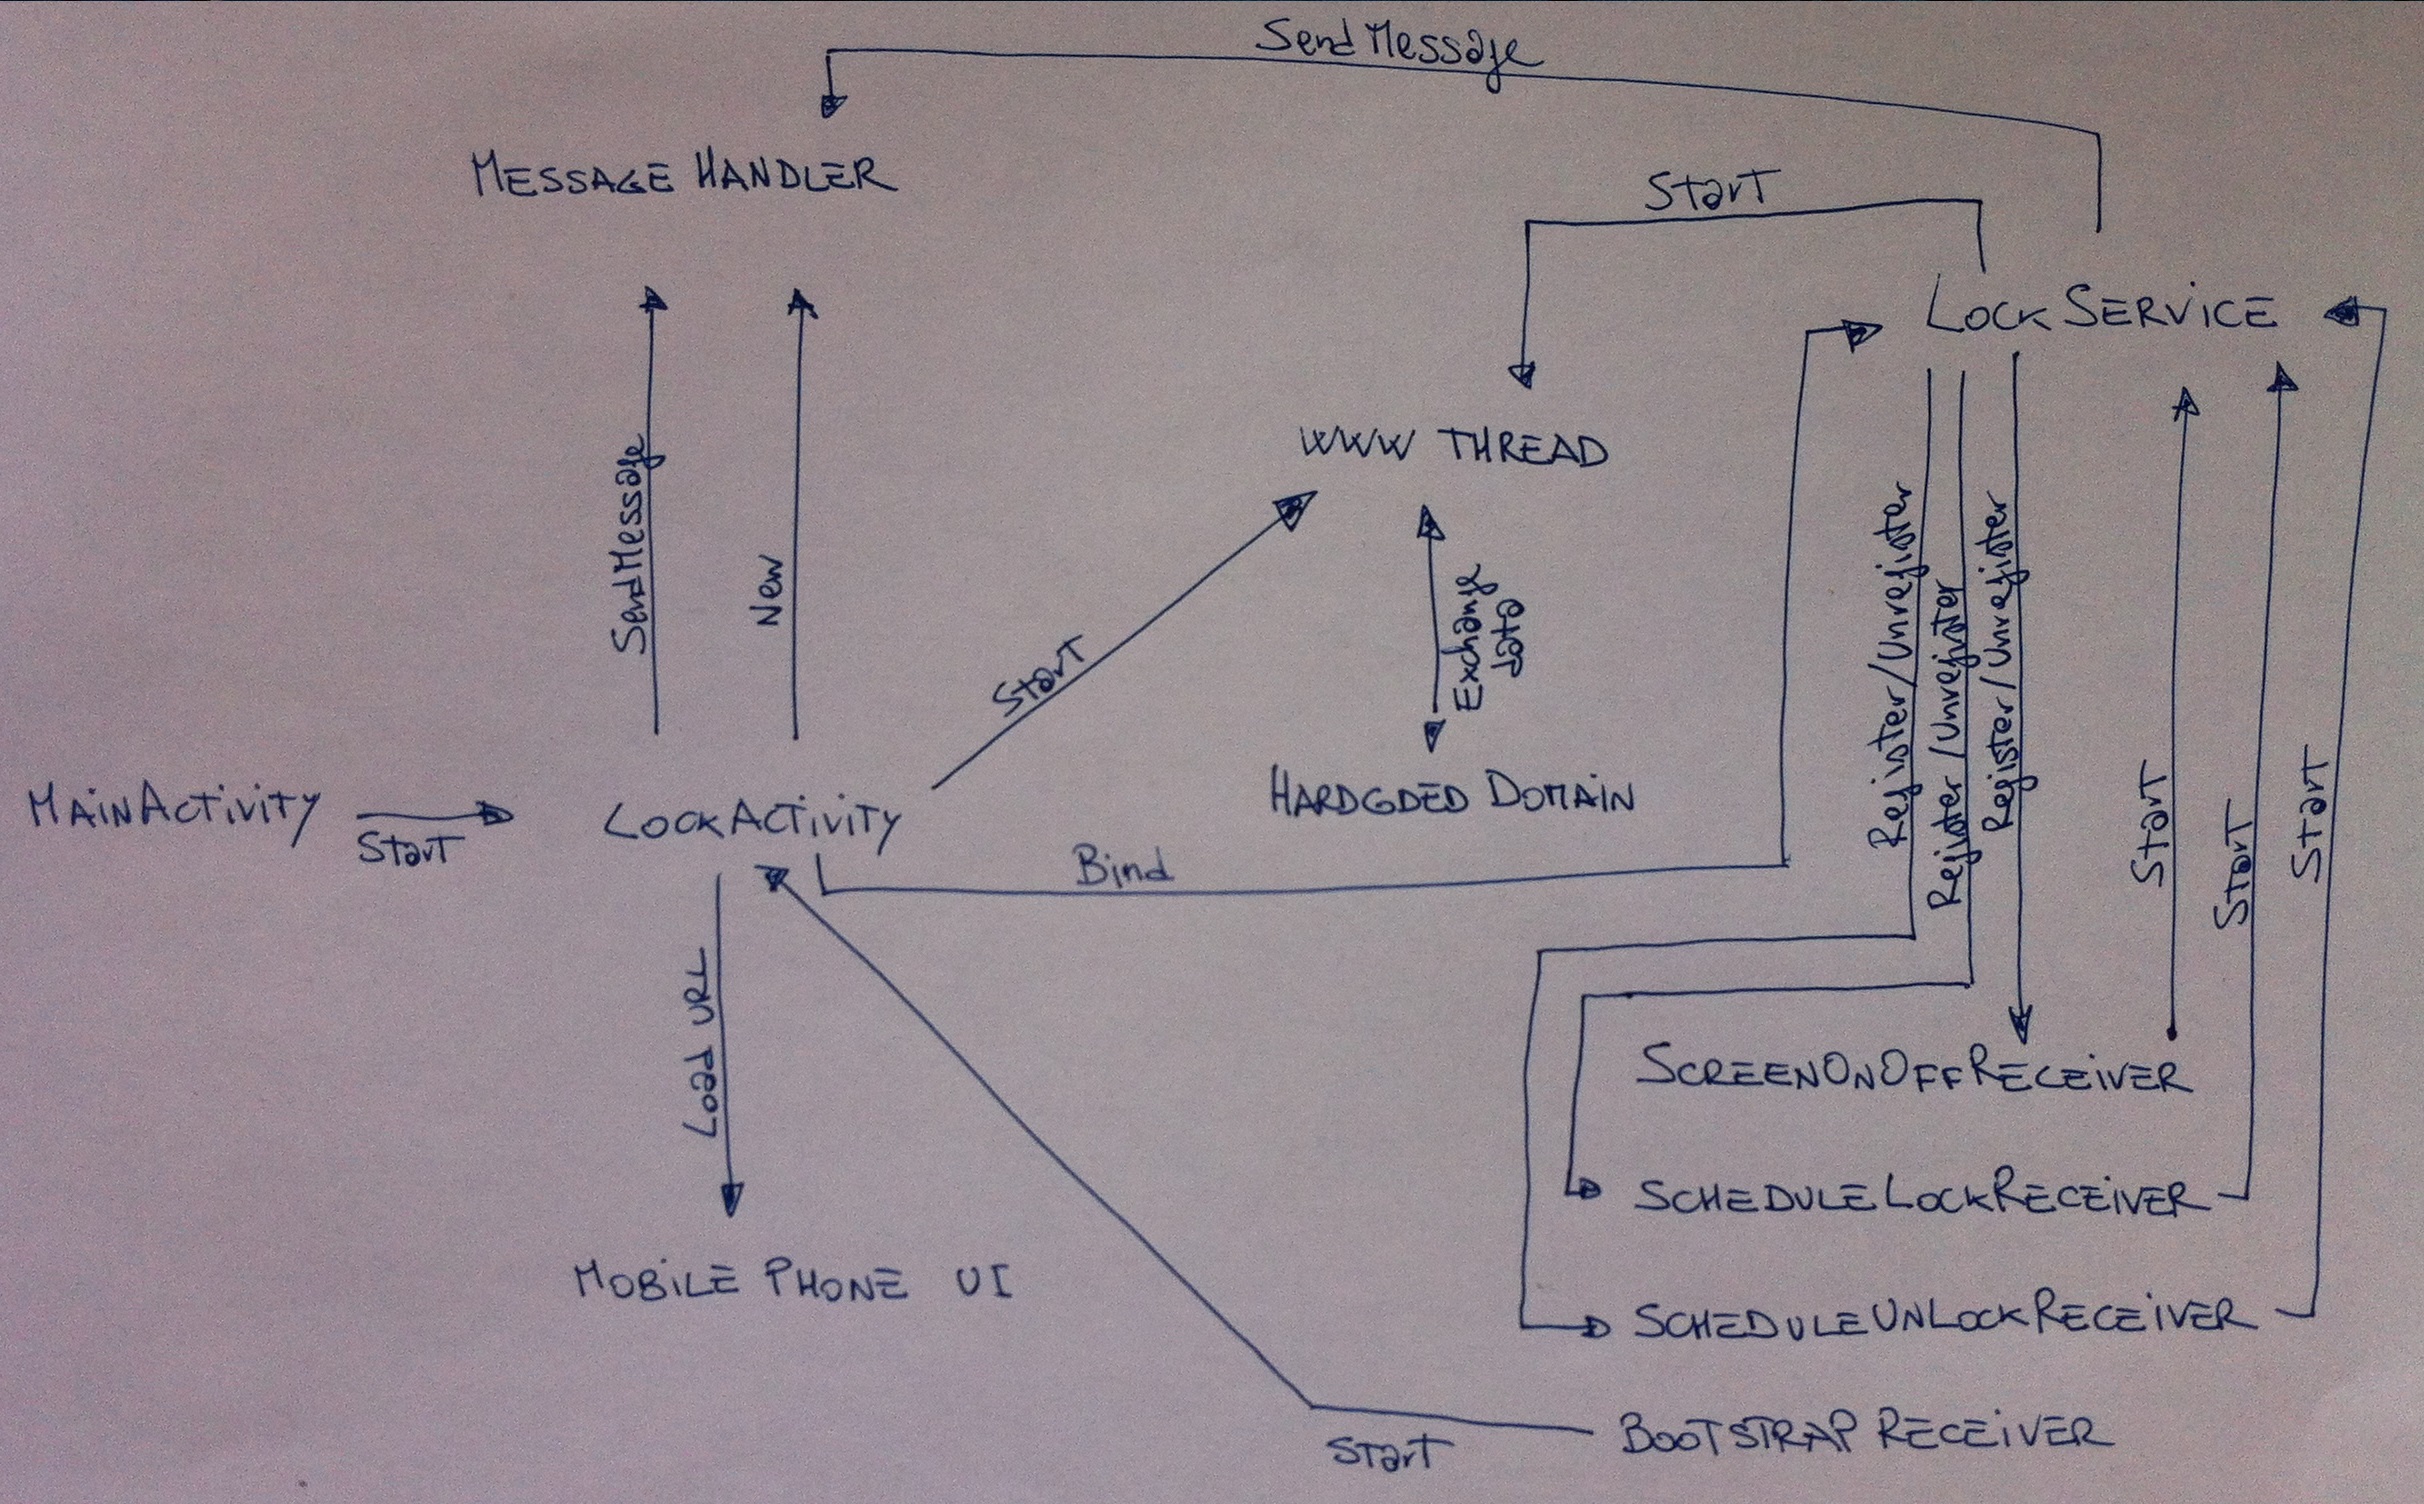
While I’m reversing a malware I usually use pen and paper to write down findings, no matter what’s the importance of any single clue. Sometimes it’s only a particular address or a handle, but for complex malware I like to draw a scheme with all the entities because it’s particularly useful when I have to put together all the small pieces to complete the final puzzle. I’ve seen malwares that are much more complicated than Koler, but the use of obfuscated names (Proguard is most probably used) increased the time I spent to understand everything .
In my humble opinion Koler is not so interesting per se, but it’s an advice of what a mobile malware could be in the near future. There are some nice descriptions around the web that are almost complete in terms of general functionalities. They all explain in few phrases the features of the malware:
– it sends the International Mobile Equipment Identity (IMEI) to a remote server
– open a browser page that displays a notice about the lock status of the device (in your language)
– claim to encrypt all the file inside the mobile phone
– ask for a ransom payment
– it somehow blocks the use of the device
– they all end with some tips on how to remove the trojan from the mobile phone
These are nice readings for sure because I like to be informed on every possible new threats, but I also would like to learn something new in terms of technical knowledge. My impression is that all of these articles are pretty similar, and they all seem to be born from what I know to be the first real article about the subject written by @kafeine.
I’m not asking for a complete analysis (it could require a lot of time and too many pages to write down), a detailed part on a specific argument or a personal comment about specific parts could be enough.
Since of there are a lot of Android components involved in the general scheme of this malware I decided to write a description of the methodology I used to statically studied the malware. It’s an easy level tutorial, but I hope to give you some hints on how to approach an Android malware directly working on components/entities like activities, services, receivers, message handlers, etc.
Apk SHA is 511993D3C99719E38A6779073019DACD7178DDB9.
Activity
“An activity provides a user interface for a single screen in your application”. According to the image at the beginning of the post, there are only two objects that are not pointed by an arrow: MainActivity and BootStrapReceiver. What does it mean? Making the story short I can simply say that these are two different starting points of the application. Take a look at AndroidManifest.xml file:
<activity android:label="@string/appName" android:name="com.android.MainActivity">
   <intent-filter>
      <action android:name="android.intent.action.MAIN" />
      <category android:name="android.intent.category.LAUNCHER" />
   </intent-filter>
</activity>
Few lines to specify the activity to launch: com.android.MainActivity is the starting point of the entire package.
The manifest file is always the first thing you should put your hands on, it generally shows you the path to follow.
The activity contains a lot of methods, where do I have to start from? I normally start checking the init method because it does reveal the initial value of main variables. This is the very first method I use to check on a new class file to study. Besides that, there are an unspecified number of various methods, and some of them are callback methods called by the system when the activity switches from one state to another. These are really important, you have to take the activity life-cycle in your mind in order to better understand the complete behavior of the activity.

Activity life cycle (from developer.android.com)
MainActivity defines onCreate only, it’s called when the system is creating the activity. Besides the layout initialization (which is a must and it’s defined calling SetContentView function) a coder can do whatever he wants inside the method. This time OnCreate is the only defined callback. The reason is simple because the only job of the activity is to start a new activity named LockActivity, the real starting point of the malware.
Intent intent = new android.content.Intent(this.getApplicationContext(), "com.android.LockActivity");
intent.setAction("android.intent.action.VIEW");
intent.addFlags(FLAG_ACTIVITY_NEW_TASK);
this.startActivity(intent);
startActivity is the function used to launch the new activity. The parameter of the function is an intent defined in the previous lines, it contains a little description of the operations to be performed:
– com.android.LockActivity contains the implementation of the activity
– set the action to be performed: it will display data to the user
– FLAG_ACTIVITY_NEW_TASK: the author wants to launch the activity into a new task
com.android.LockActivity
This new activity is by far different from MainActivity because it has a complete life cycle definition. Among all the methods you will find most of the callbacks that are on the activity scheme: onCreate, onStart, onResume, onPause, onStop and onDestroy. The first three methods are executed in sequence, here’s a brief explanation of them.
OnCreate: first of all it creates a new message handler class, after that it gets the IMEI and the buildID of the malware itself. To obtain the IMEI code it uses a method defined inside com.android.6589y459gj4058rtgk class:
public static final java.lang.String 6589y459gj4058rtga(android.content.Context p1) {
   android.telephony.TelephonyManager tManager = p1.getSystemService("phone");
   if (!check_cast(tManager, android.telephony.TelephonyManager)) throws ClassCastException;
   String imei = tManager.getDeviceId();
   return(imei);
}
The malware needs another code, buildID, which is inside one of the resources:
java.lang.String 6589y459gj4058rtgf = this.getResources().getString(0x7F050003);
The application resources are located inside project/res folder. Strings are generally located inside project/res/values/strings.xml file:
<?xml version="1.0" encoding="utf-8"?>
<resources>
    <string name="appName">BaDoink</string>
    <string name="serviceName">mainserviceid</string>
    <string name="lockActivityName" />
    <string name="buildid">C143D55D996634D1B761709372042474</string>
</resources>
Four strings has been defined, what’s the one with 0x7F050003 id? The answer is inside another xml file, a quick search reveals the reference in public.xml:
<?xml version="1.0" encoding="utf-8"?>
<resources>
    <public type="drawable" name="android_icon" id="0x7f020000" />
    <public type="drawable" name="app_icon" id="0x7f020001" />
    <public type="drawable" name="app_main_screen" id="0x7f020002" />
    <public type="layout" name="activity_main" id="0x7f030000" />
    <public type="raw" name="pubkey" id="0x7f040000" />
    <public type="string" name="appName" id="0x7f050000" />
    <public type="string" name="serviceName" id="0x7f050001" />
    <public type="string" name="lockActivityName" id="0x7f050002" />
    <public type="string" name="buildid" id="0x7f050003" />
    <public type="array" name="hardcodeDomains" id="0x7f060000" />
    <public type="style" name="AppTheme" id="0x7f070000" />
</resources>
It’s easy to get the buildID: C143D55D996634D1B761709372042474.
The last performed action inside the current method is to bind the service com.android.LockService. The bind operation is used to start a service, I’ll tell you later all the details about this operation.
onStart: it simply sets a flag. I call it StopFlag because the value is false when the activity starts and true on onStop.
onResume:
protected void onResume() {
   super->onResume();  // Necessary and required by the system
   6589y459gj4058rtga = false;   // PauseFlag
   6589y459gj4058rtgf();	// Send CHECK_FOR_UNLOCK message to message handler
   v0 =com.android.LockService.6589y459gj4058rtgd();
   if (v0 != null) goto _32;
   return;
_32:
   v0.6589y459gj4058rtgb();
   return;
}
The most important part of the method is the last:
v0 =com.android.LockService.6589y459gj4058rtgd();
v0.6589y459gj4058rtgb();
I’ll discuss the LockService later but at the moment it’s important to spend some time over these two lines of code. The first line calls a method inside LockService, it’s declared as:
public static declared synchronized com.android.6589y459gj4058rtga.6589y459gj4058rtgc 6589y459gj4058rtgd()
v0.6589y459gj4058rtgb() is used to call 6589y459gj4058rtgb inside com.android.6589y459gj4058rtga.6589y459gj4058rtgc, let’s take a look at this class. Here is the output produces by my DexInspector.:
public interface abstract class com.android.6589y459gj4058rtga.6589y459gj4058rtgc extends java.lang.Object {
    public abstract void 6589y459gj4058rtga()
    { }
    public abstract void 6589y459gj4058rtga(com.android.6589y459gj4058rtga.6589y459gj4058rtga)
    { }
    public abstract void 6589y459gj4058rtgb()
    { }
    public abstract void 6589y459gj4058rtgb(com.android.6589y459gj4058rtga.6589y459gj4058rtga)
    { }
}
What does it mean? Why can I see empty methods only? The class is just an interface and the code of each method is implemented inside another class. An easy search through the classes reveals where the real code is:
public class com.android.6589y459gj4058rtgc.6589y459gj4058rtga extends java.lang.Object implements com.android.6589y459gj4058rtga.6589y459gj4058rtgc java.lang.Runnable
So, now I’m able to give a meaning to the two lines of code of the onResume method I was studying:
v0 =com.android.LockService.6589y459gj4058rtgd();
v0.6589y459gj4058rtgb();         //	Start com.android....rtgc...rtga as a thread
There are some other class defined as interface, now within few seconds you should be able to locate the real code of every empty class.
After onResume callback the activity is in a running status, and the flow depends on the behaviour of other entities like service, thread, human-operation, etc.
I can’t say too much about the other common callbacks: onPause, onStop, onDestroy. There are a lot of conditional checks over boolean variables because the author uses them to store the status of things like stop/run, pause/run and so on. I’m sure you won’t have problems trying to understand the code, just pay attention to the obfuscated names and you’ll surely understand everything about this class.
Message handler
LockActivity creates a new instance of com.android.6589y459gj4058rtgp class inside onCreate method, the class represents the message handler. How do I know it? The declaration gives a big hint:
public class com.android.6589y459gj4058rtgp extends android.os.Handler
It extends android.os.Handler. Moreover there are few methods only inside the class and all of them are called by a method called handleMessage, the name of the public method you have to subclass in case you want to receive messages.
A custom message handler class doesn’t have a life cycle like an activity or a service, you don’t have a specific entry point. I sugget to start the analysis from the subclassed methods, in this case handleMessage because it’s the only one.
Here is a brief analysis of handleMessage (in order to keep the code clean and readable I removed useless instructions/keywords from it).
v3 = new Array of java.lang.Object[1] = {p1.obj}; // Read the message (p1 is the parameter)
if (p1.obj == null) goto _return; // Empty message
instance_of(p1.obj, com.android.6589y459gj4058rtgs) ? v0=true : v0=false; // Is it a valid message?
if (v0 != false) goto _check_message;
_return:
return;
_check_message:
Initial check over the received message, if the message is valid it proceeds to identify it:
if (!check_cast(p1.obj, com.android.6589y459gj4058rtgs)) throws ClassCastException;
v2 = com.android.6589y459gj4058rtgs.UNINSTALL;
if (p1.obj != v2) goto _check_CHECK_FOR_UNLOCK;
// Uninstall message received
6589y459gj4058rtgb(); // UNINSTALLMethod
UNINSTALL message has been received, it handles it by calling 6589y459gj4058rtgb. You’ll see this piece of code some more times inside handleMessage because there’s a check for every single type of possible received messages. The list of the available messages is composed by: UNINSTALL, CHECK_FOR_UNLOCK, SET_UNLOCK and FIND_VALID_DOMAIN.
The most interesting message is the last one because it’s called when the malware needs to load one of the hardcoded URL located inside arrays.xml file (it’s under res folder and it contains a complete list of available URLs).
WWW Thread
Here’s another entity created by LockActivity, it’s referenced by the class com.android.6589y459gj4058rtgc.6589y459gj4058rtga:
public class com.android.6589y459gj4058rtgc.6589y459gj4058rtga extends java.lang.Object implements com.android.6589y459gj4058rtga.6589y459gj4058rtgc java.lang.Runnable
The class defines his own method and it implements some more methods. It also implements Runnable so, after init, I would check run method because it’s called when the thread is started.
There’s a data exchange between the external domain and the mobile phone. The malware provides to pass the IMEI (and the buildID) to the domain, and the domain sends back something else which is base64 encoded. As far as I’ve seen this is the only place from where crypto related functions are used. I will reveal the details about this part in a future blog post. Just in case you can mail me for some more details. However in the last part of the run method, after a series of calls to various methods, the web page containing the notice about the locked device is loaded on the infected mobile phone (via sendMessage(FIND_VALID_DOMAIN)).
Service via bindService
I introduced the Service component inside LockActivity, exactly when a bind operation was performed:
this.bindService(new android.content.Intent(this, 6589y459gj4058rtgm), 6589y459gj4058rtgs, BIND_AUTO_CREATE);
Three parameters:
service: the service to connect to, com.android.LockService
conn: it’s a valid ServiceConnection object (com.android.6589y459gj4058rtgt), and it declares two standard methods, onServiceConnected and onServiceDisconnected used to receive start and stop connection information
flag: BIND_AUTO_CREATE stands for automatic creation of the service.
According to Android web page a service is defined as an application component that can perform long running operations in the background and does not provide a user interface. A bound service runs only as long as another application component is bound to it.
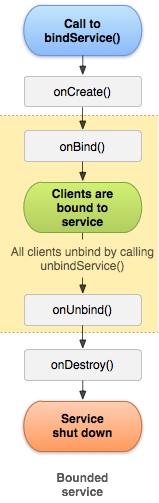
Bounded service life-cycle (developer.android.com)
The image respect the fact that the service stays in background until unbindService is called. The scheme is very important for me, because it reveals the pah to follow for an almost complete analysis of the service. You have to study, in order: onCreate, onBind and finally onUnbind and onDestroy.
onCreate: this method is responsible of the creation of a system used to catch specific actions and broadcast particular intents. It sounds confusing right now, but everything will be clear in the next section.
OnBind: nothing really special, it returns an Ibinder reference.
OnUnbind/onDestroy: the client is not bound to the service anymore.
BroadcastReceiver
Here is another entity of the Android world, it’s basically defined to receive intents sent by sendBroadcast method. Intents broadcast are used to notify Broadcast Receivers. Once the intents arrive the onReceive method will take care of it. LockService’s onCreate defines a BroadcastReceiver in this way:
// Add intent filter for SCREEN_ON and SCREEN_OFF
IntentFilter intentFilter = new android.content.IntentFilter("android.intent.action.SCREEN_ON");
intentFilter.addAction("android.intent.action.SCREEN_OFF"); intentFilter.setPriority(0x3E7); // 999, high priority 6589y459gj4058rtga = new com.android.ScreenOnOffReceiver();
this.registerReceiver(6589y459gj4058rtga, intentFilter);
The receiver is registered with registerReceiver method. It takes two parameters, the BroadcastReceiver and the intents broadcast to be received.
The receiver is defined inside com.android.ScreenOnOffReceiver file and it has the only necessary method, onReceive. It handles the broadcasted intents checking for “android.intent.action.SCREEN_ON” or “android.intent.action.SCREEN_OFF” action.
As you can see from the snippet the intent filter is associated with a prority number which is used to check, among all the applications, who can send broadcasts.
// Set Lock alarm manager via intent broadcast
AlarmManager am = this.getSystemService("alarm");// "alarm" stands for ALARM_SERVICE
PendingIntent pLock = android.app.PendingIntent.getBroadcast(this, 0, new android.content.intent(this, "com.android.ScheduleLockReceiver"), 0);
Calendar cal = java.util.Calendar.getInstance();
cal.add(0x0D, 0);
am.setRepeating(RTC_WAKEUP, cal.getTimeInMillis(), 0x7D0, pLock); // 2 seconds
Another interesting snippet in the same method, the purpose of this one is to set an alarm every 2 seconds after the first time. The action to perform when the alarm goes off is defined by a PendingIntent, com.android.ScheduleLockReceiver will handle the alarm. ScheduleLockReceiver’s task is to start LockService and it will make tough the use of your device…
Another similar piece of code is then used to define a new alarm every 10 minutes, this time the receiver is inside com.android.ScheduleUnLockReceiver but the essence doesn’t change.
There’s one more thing to say before proceed to the last section of this post. There are two ways to declare a broadcast receiver, one is statically and the other one is dynamically. I’ve shown you the dinamic version (via registerReceiver), and now it’s the turn of the other one. The static version requires few lines inside AndroidManifest.xml file:
<receiver android:name="com.android.BootstrapReceiver">
   <intent-filter android:priority="999">
      <action android:name="android.intent.action.BOOT_COMPLETED" />
   </intent-filter>
</receiver>
onReceive is inside com.android.BootstrapReceiver and the intent is received after the system has complete the booting operations.
public void onReceive(android.content.Context p1, android.content.Intent p2) {
   // Start LockActivity activity
   Intent intent = new android.content.Intent(p1, "com.android.LockActivity");
   intent.setAction("android.intent.action.VIEW");
   intent.addFlags(FLAG_ACTIVITY_NEW_TASK)
   p1.startActivity(intent);
   return;
}
To be sure the malware will run after a boot the receiver will start the core of the entire malware, LockActivity.
Once again, AndroidManifest.xml represents the first thing to take care of when you are studying an Android based malware.
Service via startService
Service once again? Yes, there’s something more to say about it.
Did you happen to take a look at the code of the receivers? Three of the four receivers have an almost identical code:
// Run service LockService using startService
Intent intent = new android.content.Intent(p1, class("com.android.LockService"));
intent.putExtra("start.event.type", 0x01);
p1.startService(intent);
Is it possible to start a service in two distinct ways? Yes it is. There is a big difference with a bound service because now the service runs in the background indefinitely, no matter wether the component that started the service it’s destroyed.
The second line of the snippet contains a call to putExtra method, it’s a way to pass extended data to a service. Take a close look at ScreenOnOffReceiver, ScheduleLockReceiver and SheduleUnlockReceiver, you’ll notice that they all run the service using the same piece of code with just a little exception: the value passed via putExtra is 1, 2 or 3.

Unbounded service life-cycle (developer.android.com)
The image tells you exactly what to study. The only parts in common with a bounded service are intialization and finalization. I already know what’s inside onCreate/onDestroy so I’ve to get an eye inside onStartCommand. LockService class doesn’t have onStartCommand but onStart (which is deprecated since API level 5). The only interesting instruction inside the method is represented by the next one:
6589y459gj4058rtga(p1, p1.getIntExtra(6589y459gj4058rtgm, 0x00));
It calls 6589y459gj4058rtga with two parameters: the intent and the value of “start.event.type”. The int value is next used to understand who really runs the service and to perform specific operations:
private final void 6589y459gj4058rtga(android.content.Intent p1, int p2) {
   switch(p2) {   // Check the parameter
      case 0x00:   goto _default;
      case 0x01:   goto _case_1;
      case 0x02:   goto _case_2;
      case 0x03:   goto _case_3;
Final notes
It’s definitely a not-complete tutorial, I just tried to give you the most important informations explaining how to deal with components and other Android entities. Consider it as a story on how I studied the malware. Feel free to mail me for comments/criticism/whatever you want.
Thanks to @Gunther_AR for some precious suggestions!

Really great article! Its really awesome to see how you have dissected the malware even though it was obfuscated. And great tip regarding the “pen and paper to write things down”. I have to try it too :)
Thx Victor, I’m glad to read that someone likes it.
Let me know if pen&paper really works for you too :)